
Blogs
How to Clean a Cream Dispenser: Complete Maintenance Guide
Apr
Table of Contents
Why Cleaning Your Cream Dispenser Matters
Maintaining a clean cream dispenser is essential for both practical and hygiene reasons. Proper care ensures consistent performance and extends the life of your equipment significantly.
Hygiene and Food Safety: Without regular cleaning, bacteria and residue can accumulate inside the chamber and nozzle, potentially contaminating your cream and compromising food safety.
Optimal Performance: When residue builds up around the nozzle and gasket, the dispenser may produce weak output, sputtering, or uneven application. Regular cleaning maintains the pressure seal and ensures smooth operation.
Enhanced Product Longevity: Limescale, cream residue, and mineral deposits can corrode internal metal components and degrade rubber gaskets. By cleaning regularly, you can extend the operational life of your dispenser by years.
Superior Taste Quality: Residual cream left inside the dispenser can transfer off-flavours to your fresh cream, affecting the taste of your desserts and beverages.
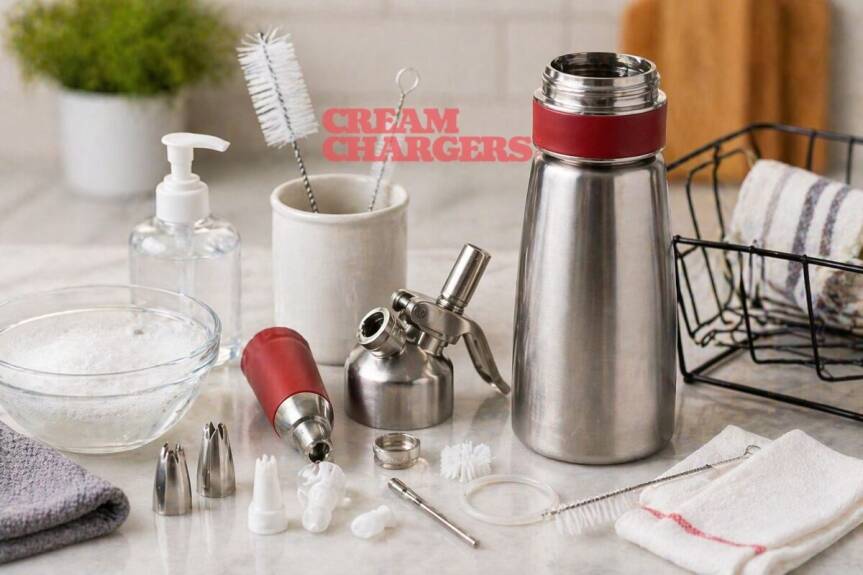
What You’ll Need
Use lukewarm water — not boiling — to avoid damaging rubber components.
A gentle, food-safe dish soap. Avoid aggressive chemicals that may harm gaskets.
Essential for scrubbing the interior chamber walls and reaching inaccessible areas.
Perfect for cleaning narrow tubes, nozzles, and fine tips where standard brushes won’t fit.
For drying components and polishing the exterior without leaving residue.
Excellent for removing limescale and mineral deposits during monthly deep cleaning.
Natural deodoriser that eliminates odours and stains from cream residue.
Step-by-Step Cleaning After Every Use
The most important maintenance routine is cleaning your cream dispenser immediately after use. Cream residue hardens as it dries, becoming increasingly difficult to remove.
Clean your cream dispenser within 15 minutes of use for easiest removal of cream residue. Fresh residue wipes away quickly, whilst dried cream requires soaking and scrubbing.
Depressurise the Chamber
Point the nozzle away from your body and carefully trigger the lever to release any remaining pressure. This is a critical safety step that prevents accidents during disassembly.
Disassemble the Dispenser
Carefully unscrew the top cap and remove the internal components — the gasket (rubber ring), collar, and nozzle tip. Place these parts on a clean surface. Refer to your dispenser’s manual for specific disassembly instructions.
Rinse the Nozzle and Small Parts
Hold the nozzle and small components under warm running water, allowing the water to flow through them. Gently rub away any cream residue with your fingers, paying particular attention to the nozzle tip.
Wash the Main Body
Fill a large bowl with warm water and a drop of mild washing up liquid. Submerge the main chamber and use a bottle brush to scrub the interior walls thoroughly, paying attention to the bottom where cream residue settles.
Clean the Gasket Carefully
The rubber gasket is delicate and crucial for maintaining pressure. Hold it under running water and gently rub with your fingers or a soft cloth. Do not scrub aggressively. Inspect for any cracks or deterioration.
Rinse Everything Thoroughly
Rinse all components under clean running water multiple times to remove all soap residue. Any washing up liquid left inside can affect the taste of your cream and interfere with the seal. Ensure water runs clear.
Air Dry All Components
Place all components on a clean cloth and allow them to air dry completely before reassembly. Avoid using kitchen roll that may shed fibres. Ensure no moisture remains, particularly on the gasket and internal threads.
Reassemble the Dispenser
Once all parts are completely dry, carefully reassemble in reverse order. Ensure the gasket sits properly in its groove, and screw the top cap on firmly but not excessively tight.
Never leave your cream dispenser assembled and sitting with cream inside it — even in a refrigerator. The combination of moisture, pressure, and stored cream can lead to bacterial growth and unpleasant odours. Always clean and disassemble after use.
Deep Cleaning Your Dispenser
Beyond the daily rinse, a thorough deep clean once monthly removes stubborn limescale, mineral deposits, and odours that regular washing can’t eliminate. This process takes approximately 30 minutes and significantly extends your dispenser’s lifespan.
The White Vinegar Soaking Method
White vinegar is highly effective for dissolving limescale and mineral buildup caused by hard water — a common issue across the UK.
- Mix equal parts white vinegar and warm water in a large bowl
- Submerge all removable components (nozzle, gasket, collar, internal tube) in the solution
- Allow to soak for 30–45 minutes to break down mineral deposits
- Use a bottle brush or pipe cleaner to gently scrub away loosened deposits
- For the main chamber, pour the solution inside and let it sit for 20 minutes, then scrub
- Rinse all components thoroughly multiple times to remove all vinegar smell
- Air dry completely before reassembling
Baking Soda for Odours and Stains
- Mix baking soda with a small amount of water to create a paste
- Apply the paste to the interior of the chamber using a bottle brush
- Scrub gently in circular motions, paying attention to stained areas
- Allow the paste to sit for 15–20 minutes, then scrub again gently
- Rinse thoroughly with clean water — repeat if necessary for stubborn odours
Never use bleach, acetone, or harsh solvents on your cream dispenser. These chemicals can damage rubber gaskets, corrode metal components, and leave residues that contaminate your cream. Stick to food-safe, gentle cleaning solutions only.
How to Clean the Nozzle and Decorating Tips
The nozzle is the most critical component and often the most problematic area for blockages. Proper nozzle care ensures beautiful, consistent whipped cream application every time.
Cleaning with Pipe Cleaners
- Hold the nozzle under warm running water to remove surface cream
- Select a pipe cleaner that fits snugly inside the nozzle opening
- Gently push the pipe cleaner through the nozzle’s central channel
- Twist and rotate the pipe cleaner while moving it back and forth to dislodge stubborn cream
- Repeat with fresh pipe cleaners until no cream residue appears on the cleaner
- Soak stubborn nozzles in warm soapy water for 10 minutes before attempting to clean
Dealing with Blocked Nozzles
- Fill a small cup with white vinegar
- Submerge the blocked nozzle tip-down in the vinegar
- Allow to soak for 2–4 hours or overnight
- Use a pipe cleaner to clear the softened blockage
- Rinse thoroughly and check that water flows freely through the opening
Decorating Tips Care
- Immediate Cleaning: Clean decorating tips right after use before cream dries and hardens in the fine channels
- Gentle Handling: Metal tips can dent easily — handle with care and store in a dedicated container
- Individual Soaking: For heavily soiled tips, soak each one individually for 15–20 minutes before cleaning
- Drying: Stand tips upright on a cloth to air dry completely before storing in a dry location to prevent rust
Common Problems and Solutions
| Problem | Likely Cause | Solution |
|---|---|---|
| Weak or No Output | Blocked nozzle, low pressure, or damaged gasket | Clean nozzle with pipe cleaners. Ensure the chamber is pressurised properly. Inspect gasket for cracks and replace if damaged. Hold dispenser upright when in use. |
| Sputtering or Inconsistent Spray | Partially blocked nozzle or air in chamber | Clean nozzle with pipe cleaner and soapy water. Release remaining pressure and refill the chamber completely. Ensure gasket is seated properly. |
| Bad Taste or Off-Flavour | Residual washing up liquid, vinegar, or stale cream | Rinse dispenser multiple times with clean water. Fill with fresh water and dispatch to clear any cleaning solution. Only use fresh cream. Allow thorough air drying before refilling. |
| Leaking from Gasket | Damaged gasket, improper seating, or overtightened cap | Check that gasket is properly seated in its groove. Ensure the top cap is firm but not excessively tight. If leaking persists, inspect gasket and replace if necessary. |
| Dispenser Won’t Pressurise | Damaged gasket, internal damage, or improper assembly | Ensure correct assembly with all parts aligned. Check that gasket is present and undamaged. Try refilling and pressurising again. If the problem persists, internal valve may need professional repair. |
| Nozzle Won’t Stay Attached | Worn or damaged threading | Ensure nozzle is screwed on firmly and straight. Inspect threading for damage or debris. Try a replacement nozzle tip if threading is damaged. |
| Musty or Mouldy Smell | Moisture trapped inside, incomplete drying, or bacterial growth | Perform a complete deep clean with vinegar and baking soda. Ensure all components are completely dry before reassembling. Store disassembled with the top cap off to allow air circulation. |
When to Replace Parts
Gaskets and Seals
- Replacement Interval: Every 6–12 months, depending on usage frequency
- Signs of Wear: Visible cracks, loss of elasticity, hardening, discolouration, or persistent leaking despite proper assembly
- Cost: Gaskets are inexpensive replacement parts, typically costing just a few pounds
Keep a spare gasket in your kitchen drawer. Having one available means you can immediately replace a damaged seal without interrupting your kitchen operations.
Nozzle Tips
- Replacement Interval: Every 12–24 months, or when output becomes irregular
- Signs of Wear: Enlarged or misshapen opening, uneven spray pattern, cream dripping instead of dispensing cleanly
When to Replace the Whole Dispenser
- Cracks or Leaks in the Body: Cracks in the chamber wall compromise structural integrity and food safety — replace immediately
- Persistent Valve Issues: If the dispenser consistently won’t hold pressure after replacing the gasket, internal valve damage may require professional repair or full replacement
Browse our complete cream dispenser collection for replacement parts and new units from trusted manufacturers.
Storage Tips Between Uses
Always store your cream dispenser completely disassembled, completely dry, and away from moisture. Never store an assembled dispenser — especially with liquids or cream inside.
- Disassemble Completely: Remove all removable components including the gasket, nozzle, collar, and internal tube
- Ensure Complete Dryness: Allow all components to air dry thoroughly on a clean cloth. Any remaining moisture invites mould and bacterial growth
- Store in a Cool Location: A kitchen cupboard or pantry (15–25°C) is ideal. Avoid areas prone to temperature fluctuations
- Keep Away from Strong Odours: Store away from spices or pungent foods. Cream dispensers can absorb smells if stored nearby
- Protect from Moisture: Avoid storing near dishwashers or areas prone to condensation
- Separate Components: Store components loosely so air can circulate around each part
Long-Term Storage
- Perform a deep clean using vinegar and baking soda
- Dry all components completely in a warm, dry location
- Place a small open container of baking soda in your storage area to absorb odours and moisture
- Store all components in a sealed plastic bag or airtight container
- Before using after long storage, perform a quick clean and test run before serving guests
Never store your cream dispenser with cream or any liquid inside it, even in a refrigerator. Bacteria can grow rapidly in stored cream. Always clean and store disassembled.
Frequently Asked Questions
Most manufacturers do not recommend dishwasher cleaning. Dishwashers can expose components to excessive heat, aggressive water jets, and harsh detergents that damage rubber gaskets and corrode internal parts. Hand washing with warm soapy water is the safest method. Check your specific dispenser’s manual, as some models may have dishwasher-safe components — but when in doubt, hand wash to protect your investment.
Clean your cream dispenser immediately after every use. This daily cleaning prevents cream residue from hardening and becoming difficult to remove. Additionally, perform a deep clean using vinegar and baking soda once monthly to remove limescale and odours. If you use your dispenser professionally or daily, consider deep cleaning every 2–3 weeks.
Yes — musty smells indicate trapped moisture and possible mould growth. Perform an immediate deep clean: soak all components in a vinegar solution for 30–45 minutes, then scrub with baking soda paste and allow to air dry completely in a warm, dry location. Store the disassembled dispenser with an open container of baking soda to absorb remaining odours. If the smell persists, the dispenser may have internal mould requiring professional cleaning.
Different nozzles require different pipe cleaner sizes. For standard round nozzles, use medium-thickness pipe cleaners that fit snugly without forcing. For fine decorating tips, use thinner, more delicate pipe cleaners. Keep several sizes on hand — pipe cleaner variety packs are inexpensive and provide the right tool for every cleaning task.
Yes, white vinegar is completely safe and actually recommended by many manufacturers for removing limescale. The acetic acid dissolves hard water deposits without damaging rubber or metal components. Always rinse thoroughly multiple times after vinegar cleaning. Do not soak components for excessively long periods (overnight is the maximum), and avoid mixing vinegar with other cleaning products.
Replace your gasket every 6–12 months depending on usage frequency. Signs indicating replacement include visible cracks, loss of elasticity, hardening, or persistent leaking despite proper assembly. Professional daily users may need replacement every 6 months; home users may go 12 months or longer. Keep spare gaskets on hand for emergencies — they’re inexpensive and widely available. Browse our collection of replacement parts.
Ready to Upgrade Your Equipment?
Proper cleaning extends your cream dispenser’s life significantly. When you do need replacement parts or new equipment, browse our selection of quality dispensers and accessories.