
Blogs
How to Use a Cream Charger: Step-by-Step Guide for Beginners
Jun
If you’ve just picked up your first cream whipper, figuring out how to use a cream charger can feel a little daunting. There’s a charger to load, a dispenser to fill, and a lever to pull — but once you’ve done it once, you’ll wonder why you ever bought tinned squirty cream. This guide walks you through every step, from setup to cleaning, so you get perfect whipped cream every single time.
In This Guide
What You’ll Need
Before you start, make sure you have everything to hand. You’ll need a cream whipper (dispenser), at least one N2O cream charger, fresh double cream, and any flavourings or sugar you want to add. That’s genuinely it.
Here’s a quick comparison of the two main dispenser sizes so you know which suits you:
| Feature | 0.5 Litre Dispenser | 1 Litre Dispenser |
|---|---|---|
| Best for | Home use, 2–4 servings | Cafés, events, larger batches |
| Chargers per fill | 1 charger | 2 chargers |
| Max cream capacity | 300 ml | 600 ml |
| Fridge storage | Up to 10 days (charged) | Up to 10 days (charged) |
Quick Answer: How It Works
To use a cream charger, fill your dispenser with cold double cream (no more than two-thirds full), screw the head on tightly, attach a cream charger to the charger holder and screw it onto the dispenser head until you hear the gas release, shake 2–3 times, then press the lever to dispense. Always keep the dispenser upside down when dispensing, and refrigerate between uses.
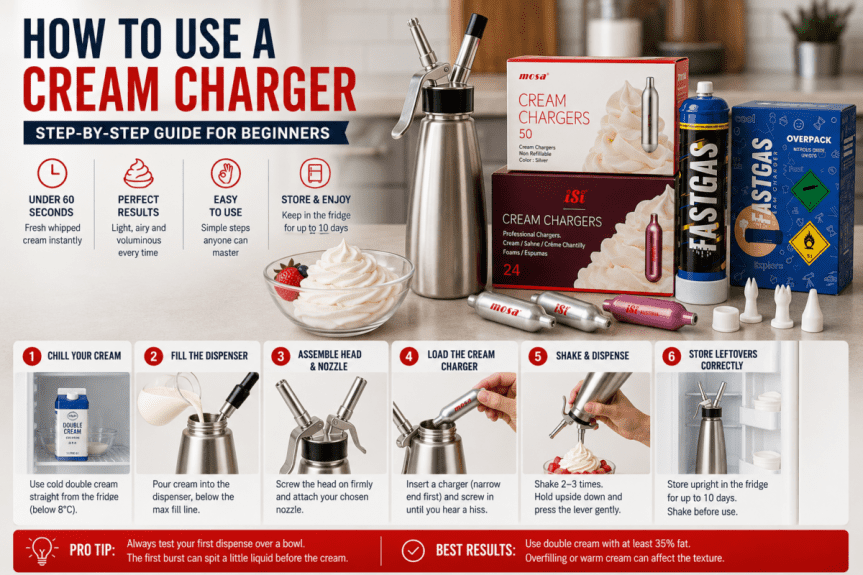
Step-by-Step: How to Use a Cream Charger
Follow these steps in order every time and you’ll get consistent, fluffy whipped cream with no waste and no mess.
Chill your cream and dispenser
Cold cream whips far better than warm cream. Pour your double cream into a jug and chill it in the fridge for at least 30 minutes before you begin. If your dispenser has been sitting in a warm kitchen, give the body a quick rinse with cold water. Warm cream can result in a loose, runny texture that won’t hold its shape.
Add your cream and any flavourings
Unscrew the head of your dispenser and pour in your cold double cream. Fill to no more than two-thirds of the total capacity — this leaves room for the gas to do its work. Add any powdered sugar, vanilla extract, or other liquid flavourings at this stage. Avoid adding thick syrups or fruit purées with pulp, as these can block the nozzle.
Screw the head on securely
Place the head back onto the dispenser body and screw it down firmly by hand. Make sure it’s fully threaded and snug — a loose head can cause the gas to escape when you charge it. Check that your chosen decorating nozzle is already attached to the head before you close it up.
Load and attach the cream charger
Drop a single N2O cream charger (8 g) into the charger holder with the narrow end pointing downward. Screw the holder onto the charger port on the dispenser head — as you tighten it, you’ll hear a short hiss as the gas punctures the charger and flows into the dispenser. Once the hissing stops, the charger is empty and fully discharged. Remove and dispose of it responsibly.
Shake and charge
Hold the dispenser with the head pointing upward and give it 2–3 firm shakes. This helps the N2O dissolve evenly into the cream. For a 1-litre dispenser, repeat steps 4 and 5 with a second charger for the best results. Don’t over-shake — two or three shakes is all you need.
Dispense your whipped cream
Turn the dispenser completely upside down so the nozzle points downward. Hold it over your dessert, coffee, or hot chocolate and press the lever firmly. The pressurised gas forces the cream through the nozzle, whipping it instantly as it emerges. Use a steady, controlled press for a consistent swirl. If you need to stop mid-use, simply release the lever and return the dispenser to the fridge.
Always keep your dispenser upside down when pressing the lever. If you try to dispense with it the right way up, you’ll release only gas and get nothing but air on your pudding.
Tips for the Best Results
The difference between good whipped cream and great whipped cream comes down to a few small habits. Use double cream with at least 35% fat content — single cream simply won’t whip properly under gas pressure. Keep everything cold, including the dispenser head if you can. If your cream comes out too liquid, try chilling the filled, uncharged dispenser for 15 minutes before attaching the charger.
For flavoured cream, stick to liquid extracts and fine powders rather than chunky additions. A teaspoon of vanilla extract or a tablespoon of icing sugar dissolves cleanly and won’t cause blockages. Once charged, your dispenser can stay in the fridge for up to ten days — give it a quick shake before each use to redistribute the cream.
Cleaning Your Dispenser
Proper cleaning keeps your dispenser hygienic and extends its lifespan significantly. Before cleaning, always release any remaining pressure by pressing the lever until the gas is fully discharged — never attempt to unscrew the head while the dispenser is still pressurised.
Once depressurised, unscrew the head and remove all parts: the head, charger holder, nozzle, and silicone gasket. Wash each piece in warm, soapy water and rinse thoroughly. The dispenser body can be rinsed and dried. Most nozzles and gaskets are dishwasher-safe on the top rack, but check your manufacturer’s guidance. Never submerge the charger holder in water. Allow all parts to air-dry fully before reassembling.
Frequently Asked Questions
Ready to Get Started?
Browse our full range of cream chargers and dispensers — with next-day UK delivery available on all orders. Everything you need, delivered to your door.